Maintaining a secure and up-to-date IT infrastructure is crucial for all organizations in today’s fast-paced digital world. However, scanning for vulnerabilities and applying patches will be a time-consuming job. That’s where AWS Patch Manager comes into play. In this Blog post, we will explore the capabilities of AWS Patch Manager, its features, and its use cases in simplifying patch management for AWS users.
Understanding AWS Patch Manager:
AWS Patch Manager is a fully AWS-managed service that helps automate patching Amazon EC2 instances, on-premises servers, edge devices, and virtual machines (VMs). It provides a unified solution for managing patches across different platforms, making it easier to maintain the security and compliance of your infrastructure. It supports both Linux and Windows Server, making life easier and separating Linux and Windows patching using AWS Tags.
Patch Manager prerequisites:
There are a few prerequisites that need to be completed before using the Patch Manager
Key Features of AWS Patch Manager:
- Automated Patching: AWS Patch Manager automates the patching process for your EC2 instances, on-premises servers, and VMs. This eliminates the need for manual intervention, saving time and reducing the risk of human errors. You just need to monitor the status. It will also send you the report on your configured email using SNS topics.
- Centralized Patch Management: With Patch Manager, patching is managed from an AWS Patch Manager console. This allows you to maintain a consistent patching strategy across your entire infrastructure and ensures that critical updates are deployed in a consistent and timely manner.
- Patch Compliance Monitoring: The service provides comprehensive visibility into the patch compliance status of your managed instances. You can easily track in the dashboard which instances are missing patches, identify vulnerabilities, and take necessary actions to remediate them efficiently.
- Flexible Scheduling using Maintenance window: AWS Patch Manager has the feature to create maintenance windows and specify the preferred time for patch installations. This ensures minimal disruption to your production environment and enables you to align patching activities with your organization’s operational requirements. It means you schedule the automated patching after your business hours and you just have to track status.
Get Started with a Practical Demonstration of AWS Patch Manager. Here we are going to cover how to get started with AWS Patch Manager, and how to automate the patching using different methods.
Steps to Follow
- Create 2 EC2 instances with the latest amazon linux ami. You can check our step-by-step creation of EC2 for creating the EC2 instance. Skip this step if you already have EC2 instances created in your account. Wait for a few minutes to get the instances in an available state.

- Connect to your instances using EC2 Instance connect option or you can choose the ssh key pair also. Check for the AWS SSM agent status and start the ssm agent service. Start the agent service if it is not in a running state.
sudo systemctl status amazon-ssm-agent :- Command to check the status
sudo systemctl start amazon-ssm-agent :- Command to start the service

- Create an EC2 IAM role that has access to the SSM service
Choose Trusted Entity Type, AWS Service. Use case, EC2 and choose Next

Add Permissions, In the Search box add SSM and select AWSSSMFullAccess, AmazonSSMManagedInstanceCore. You can add fine-grained access after your initial testing by removing the AWSSSMFullAccess.

On the same page after selecting SSM-related permission, search for S3. Choose AmazonS3FullAccess. Please note you need to add fine-grained access after your initial testing. You can create and choose that specific bucket to store your ssm patching operation output.

Provide the Role Name and Description of your choice. Review the permissions. Hit on create role.

- Attach the IAM role to EC2
We have successfully created an IAM role that provides EC2 access to SSM and S3. This IAM role now needs to be attached to the EC2 instance running.
Go back to the EC2 page, Select the Instance, Actions-> Security -> Modify IAM Role
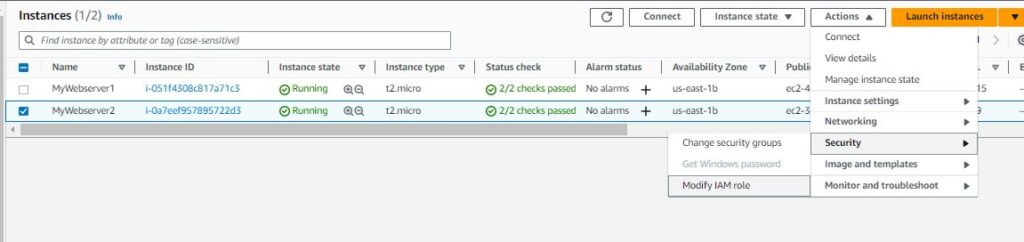
From the dropdown menu, Select the role name which you just created. Select Update IAM role
This step needs to be completed on all EC2 instances.
- Add Patching Tag
Select the instance, Choose Tags -> Manage Tags

Click on Add new tag and new tag as Patching -> yes. Select Save
You can check the Tag to review it.
Follow this step to other EC2 instances as well.
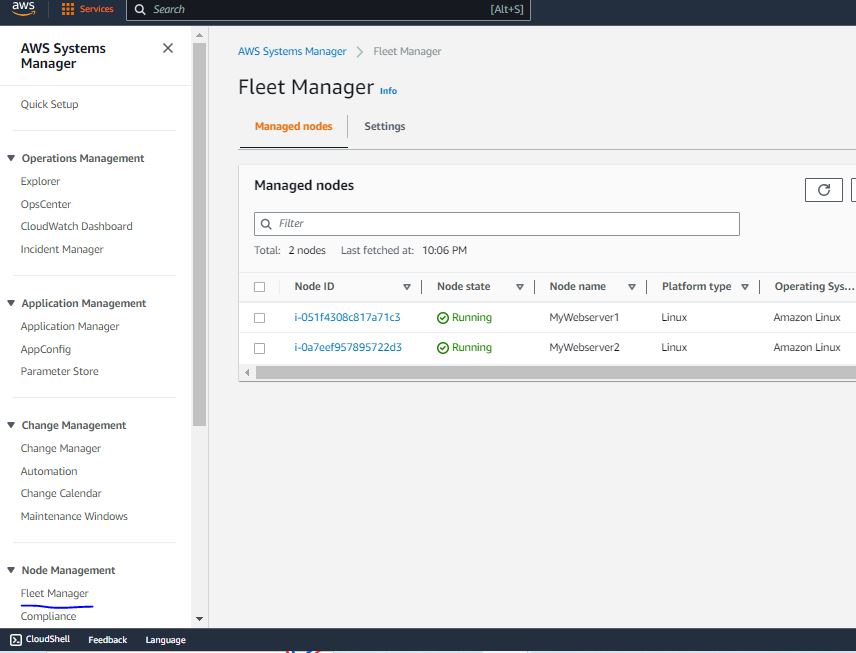
- Search for AWS Systems Manager in the AWS console. Select Fleet Management from the left side of the screen. You will find all your instances showing in that console. It might take few minutes to reflect the instances in the AWS system manager.
AWS Patch Manager Using Patch Policy
Select the Patch Manager from the left side of the screen, Create Patch Policy.

Choose Region and Click on Get Started.

Under Create patch policy, Select the Configuration name as LinuxPatching
Select Scanning and Installation, Patch operation as Scan and Install
Scanning schedule as Custom Scanning schedule
Choose Cron expression cron(45 17 * * ? *). Please adjust the time as per your requirement. The timings are in UTC. Choose cron expression for scan and scan install both operations.
Select Reboot if needed

Under Patch baseline, Use recommended defaults
Patching log storage, Write output to S3 bucket, Select bucket if you have any, or skip this.
Target, Choose the Current Region. Now AWS has come up with a solution to choose instances from another region as well. This will save time and configuration in each region and we can manage it from our central region.
Rate control, choose Concurrency: Provide the number or percentage of nodes to run the patch policy on at the same time. Error threshold: Provide the number or percentage of nodes to permit errors on before the patch policy fails.

Instance profile options: choose the tickbox.
Check for the summary. Choose to Create.
After creating the Policy you can review it and edit it if required.
You can check the Status and Settings.

Under setting, you can review the timings for patching, scanning, reboot action, concurrency, and nodes on which automated patching is going to perform.

Please note here the timings which are mentioned in the crown expressions are in UTC. Check the status of your patching as per the UTC time. Otherwise, it might create confusion.
This is a new method that AWS introduced in December 2022.
AWS Patch Manager Using Patch Now
This is an old good way to start patching AWS EC2 instances. Go to the Patch Manager -> Patch baselines
Here you can create your own custom Patch Baseline or you can use AWS Provided default Patch Baseline.
Patch Baselines are Operating system specific, it get selected as per the OS of your EC2 instance automatically.
On the Patch Manager page, click on the Patch Now button.

Under Patch Instances Now Select, Patching operation Scan and Install.
Reboot option -> Reboot if needed
Instances to patch -> Patch all instances . It will select all managed instances
Click on the Patch Now.

Use Maintenance Windows In case you want to schedule patching after business hours or during the weekend using this method.
Choose Maintenance Windows -> Create maintenance window
Provide Name and Description -> LinuxPatchMW
Unregistered targets -> Allow unregistered targets

Select Schedule -> CRON/Rate expression -> cron(09 19 * * ? *) Choose this as per your requirement


1 thought on “AWS Patch Manager”